Installing a socket LGA2011 Intel Core i5 or i7 processor
into a fresh motherboard can be intimidating step, particularly if you've never worked inside a
PC before. Well, PCSTATS has heard your calls for a quick Beginners Guide on this subject, so that's
what we'll be laying out in this article today!
Once you know what not to touch and how to figure out which way the CPU fits
in, it's really not all that difficult. Best of all, when it comes time upgrade
your processor with a faster chip, you can extend the lifespan of the whole PC
and save yourself a few bucks in the process!
In this PCSTATS Beginners Guide we'll show you how to install and
remove a socket LGA2011 Intel processor, step by step. If you've been
considering a computer upgrade, bookmark this Guide for future reference.
A few words of warning - Computer processors are sensitive
electronic devices. 1) Always make sure the power is off and the computer
is unplugged before opening it up. 2) Never touch the gold connector pads on
the bottom of the CPU and always be extremely careful when inserting the
processor into the CPU socket. 3) Don't touch the delicate gold pins in the socket,
they bend easily and may be damaged by the oils from your skin. 4) Always ground
yourself to a metal object before doing any work inside a computer system to
minimize the risk of an electrostatic discharge.
Get to know the Intel LGA2011 Processor
Intel's socket LGA2011 processor is a relatively
large chip, but it's built the same way as previous socket 775/1155/1156
CPUs. On the top side of the processor is
a silvery metal lid known as the 'Integrated Heat Spreader'
(IHS). The IHS has the model number and speed information laser engraved into the surface.
In one corner of the green substrate the IHS
sits on is a small gold triangle which we'll use to align the processor in
the correct direction for installation. On opposite ends of the substrate are
two notches which key into the socket. Intel doesn't list the socket number
on the actual processor, that information is printed on the box.
On the bottom
of socket LGA2011 Intel processor are two thousand and eleven gold pads and a small
patch of surface mount electrical components. The gold electrical contacts should not be touched, always
handle a processor by the edges only. The gold pads on the
base of the CPU make contact with corresponding electrical pins in the motherboard processor socket.
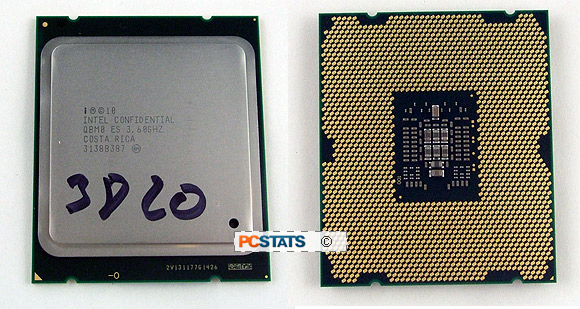
Intel socket LGA2011 CPU (top and
bottom)
Remember - It's best practice to leave the processor in
its protective chip carrier until you are ready to
install it into the socket.
The Intel LGA2011
Socket
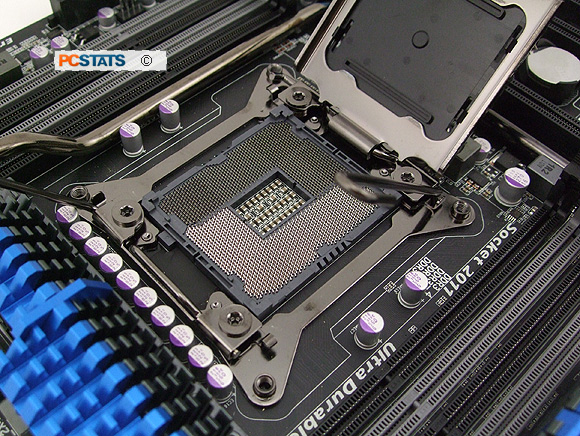
On the motherboard you'll find the Land
Grid Array 2011-pin processor socket where the CPU goes. The socket consists of essentially three
separate parts; a top metal load plate, a pair of metal lever arms and
the bottom electrical socket which consists of tiny gold pins that contact the base of the CPU.
The LGA2011 socket is
shown below with the top metal load plate and protective plastic cover folded open
so you can see the gold pins. Motherboards ship with a
protective plastic cover over
these pins when no processor is present, the pins are extremely fragile and very easily
damaged if you are careless.
Now that we're familiar with the major aspects of the
CPU package and LGA2011 socket, let's run through the process of installing an Intel socket LGA2011
processor. Later in this Guide, PCSTATS will show you how to remove
the CPU from the socket in case you want to upgrade motherboards or switch
to a faster chip.
First up: Installing an Intel LGA2011
Processor