|
Broadband technologies such as cable and DSL modems are becoming more popular than ever before, due to their high-speed access and always on connections.
85% Rating: 
|
|
|
|
Home >
Reviews >
Networking >
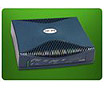
Netopia R9100 |
|
|
Installation
Considering that several
small businesses are unlikely to have a dedicated IT support staff, one of the
biggest challenges for a router such as the R9100 is the ease of which it
can be installed in an existing network. Luckily, the R9100 does
not disappoint. For starters, the R9100 can be configured even before
connecting it to the LAN, which can reduce
downtime.
This is made possible by the
9-pin serial port connector (Console). By attaching the supplied serial cable to
your PC or Macintosh, you can access the router's configuration using a terminal
program such as Hyperterminal (Windows). This setup proved very useful, as I was
able to set the router's default IP address (the one that is visible to
computers on the LAN), and several other options including the DHCP settings. In
addition, Netopia provides a SmartStart utility, which is a wizard-based program
that walks you through the initial setup of the
router. 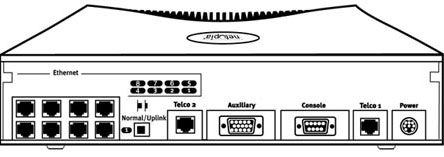 From here, the next step was to actually connect the router
to my existing LAN to verify everything was working. To do this, I connected the
supplied network cable from Ethernet port 1 on the router, to the uplink port on
my 10/100Mbps switch. (Please note that I would have provided pictures of
Following this, I restarted one of the computers on the network, and ran
"winipcfg" (from Windows 9x) to verify that the router had assigned my computer
an appropriate IP address. Sure enough, the router did its job properly, and the
IP address was given.
Powering up more computers
revealed even more of a surprise, as DHCP automatically worked for them as well.
So far, everything was going well. DHCP functioned as it should, and all the
client machines had access to the Internet, via a single IP address assigned by
my Internet provider.
The greatest key to installation however, is the
reference guide that Netopia has supplied on the accompanying CD-ROM. This guide
covers literally everything needed to install and configure the router
effectively, with fairly detailed information. It does an excellent job at
explaining how to configure filter sets (for the firewall), using support for
IPX/SPX (Novell) and AppleTalk (Macintosh) protocols, and much more. The manual
is definitely a resource which should be used extensively to make sure that the
router is being used to its maximum potential.
Configuration
There are several
ways of configuring the router's settings: Console, Telnet, and remote dial-in
access. Console is used for a physical connection between the R9100 and a
computer (via the serial cable), Telnet is used for connecting to the router via
the LAN, and remote dial-in access is used for accessing the router remotely
(useful for allowing Netopia tech support reps if there is a problem). I'll
focus on the Telnet options, as it is the method that will probably most often
be used in configuring the router. Upon using Win9x's Telnet utility to connect
to the router, a very simple menu
appears.
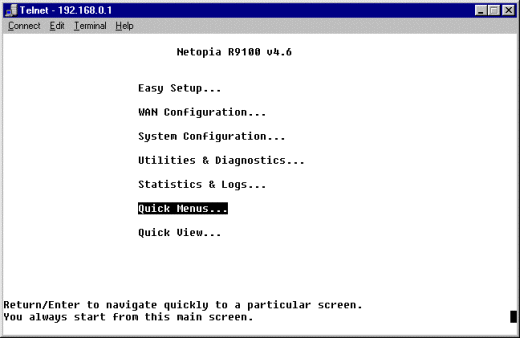
Easy Setup - This
menu offers basic configuration information, such as what IP address the router
uses to connect to the Internet (assigned via your ISP), along with the major
settings for the router's IP address and DHCP
configuration.
WANConfiguration - Used to configure more advanced
settings relating to connecting to the WAN (Internet).Options here include NAT
settings, connection profiles, and the like.
System Configuration
- Configures settings relating to the router itself, such as which protocols it
uses, filter sets, Date & Time, etc.
Utilities &
Diagnostics - Helpful utilities to troubleshoot problems. Utilities include
Ping, Trace Route, and Telnet (telnets to a remote system).
Statistics
& Logs - Provides detailed access to event logs such as router
activation/deactivation. This also displays the routing table, which is what's
used to route information from one network to another.
Quick Menus
- Displays a list of many configuration options of the R9100 at a glance. For
experienced users, this is far more effective than navigating through each
individual menu trying to find the settings they are looking
for.
Quick View - Provides a quick view of
the router's status. This allows a user to monitor the active connections,
and see what status lights are lit up (useful for troubleshooting
purposes).
|