Previously, if you wanted to unlock an
AthlonXP processor you needed three basic things, conductive paint, a filler
(epoxy for example) and clear packing tape. With the green AthlonXP 2100+
processors, things are wee bit more complicated, below you can see what was
necessary for us to modify our AthlonXP 2100+.
DISCLAIMER: Do not attempt the AXP21K+ unlocking trick.
Bringing power tools in contact with the packaging of any processor will result
in damage that will probably render the processor useless, and will void any and
all warranties expressed by AMD or the retailer you bought your processor
from. PCstats will NOT assume any responsibility to people who attempt this
procedure. Unlike older unlocking methods, this procedure physically alters the
surface of the processor, and may cause unforseen long term affects that shorten
or nullify the processor altogether. DO NOT DO THIS.

Read that disclaimer once more! Now with that
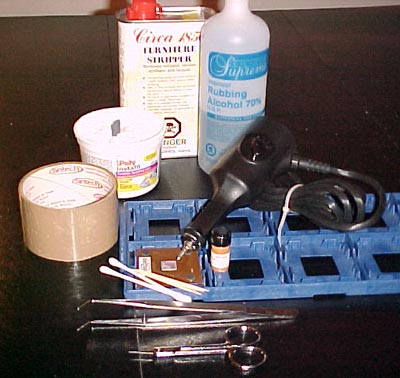
said, the above picture shows the tools of the trade; starting from the left we
used the tape to cover the L bridges we wanted to isolate. The Poly Instafil was
used to fill the valley's from the laser cuts on the OPGA packaging. The Q-Tips
and rubbing alcohol were used to clean off the processor when we needed to
reapply conductive material to the contacts.
The
brown AthlonXP processor is the reference XP1600+ we used for comparison. The small brown liquid in
the bottle next to the chip is "rear window defogger repair kit" - basically a conductive
liquid that dries in about 30sec. The most important tool for the AXP21K+ unlocking trick
is the Dremel Model 290 Engraver. The Dremel 290 was used
to cut some of the bridges on the surface of the XP 2100+. Yes that's right I said
cut. The connecting lines on
the individual bridges are only a few hundredths of an inch
thickand
it only took about three passes from the engraver (set to the lowest setting) to
break the contact lines. Other tools may be useful here, but a knife blade is not recommended as it may
cut more than what you intend.
Getting Ready to
do Damage - First Step of the AXP21K+ Unlocking
Trick
The
first thing we "modified" were the L10 bridges - we had to make them
the same as on the reference XP1600+ processor since this was the switch which allowed multipliers lower then
12.5x. What we need to do to the L10 bridges on the AthlonXP 2100+ processor
was switch them around, changing [open : closed] to [closed : open].
To do this
we first cut the closed bridge with the Dremel
290, and then filled the open bridge (left one) with some Poly Instafil. After it had dried
we spread some of the conductive material over the joint on the left bridge to close
the two gold dots and complete the circuit.
Now that multipliers above 12.5x are been disabled, we next needed to change the actual multiplier
settings on the PGA packaging of the AthlonXP 2100+ processor. As we saw in the
AthlonXP 2100+
review the L3 and L4 bridges are by
default set to L3=[closed : closed : open : open] and
the L4= [open : closed : closed : open].
What we needed to do was change the L3 and L4
bridges to the following; L3=[open : open : closed : closed]
and L4=
[open : open: closed : closed].
These changes on the surface of the OPGA changed the multiplier from 5x to 10.5x -
remember the L10 bridges had been modified, if not, the XP 2100+ would have been stuck at
13x.
Up next, the final results of about an hours'
work....
