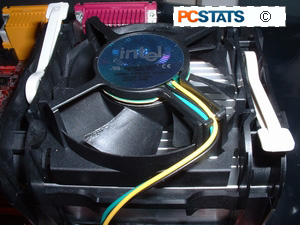
Step 4: Installing the heat sink and cooling fan (socket
478)
Cute
little guy, ain't it? German Engineering, so I'm told... Make sure the 2 levers
on the top of the heat sink are in their default unlocked
position. Since Intel processors come with
a heatsink, installation is pretty straight forward. Even things like thermal interface materials (pastes, pads, or goo's) are
already pre-applied for you.
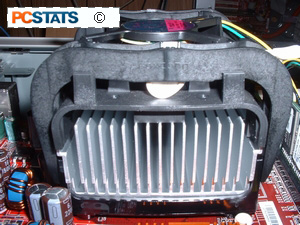
Lower the
heat sink gently into the plastic frame around the processor so
that the heatsink metal sits evenly on all sides. Push down on the plastic top of
the heatsink until the hooks on each side lock into the heatsink retention mechanism frame on the
motherboard. This will require some force. Holding one side of the heat sink
securely, pull the lever on the other side over until it locks. Again, this will
require some force.
 Repeat the procedure for the
other lever. Consult your motherboard manual for the locations of the three-pin
fan headers. There should be one close to the CPU socket. Plug the fan power
cord into that header.
Repeat the procedure for the
other lever. Consult your motherboard manual for the locations of the three-pin
fan headers. There should be one close to the CPU socket. Plug the fan power
cord into that header.
Don't
choose a fan header at random, make sure the heatsinks' fan is being
powered by the correct header for this purpose. If you get the wrong one,
the is a chance the fan may shut off when the computer is in suspended mode -
meaning the processor will overheat.
There are
many different types of after-market heatsinks for both the Intel Pentium 4 and
AMD Athlon processors. We're only covering the installation of the stock Intel
heatsink, but the basic principle for installing after-market coolers is the
same. Some heatsinks may come with a small package of white silicon-based
thermal compound which needs to be applied before the heatsink is installed. If
this is the case, only use a very small amount, and spread it over the
processor's core only. The thermal compound is only used as an interface between
the bottom of the heatsink, and the portion of the processor which it comes in contact with.
Some thermal compounds are made with conductive metals to
achieve better thermal conductivity between the heatsink and processor. If you
decide to try these types of Thermal Interface Materials (TIM) out, be sure you
clean the surface of the processor and base of the heatsink with a soft cloth
and Methyl alcohol gently before applying a small amount of the material.
Silver-based TIMs are conductive, so do not get them on any electrical
components!
Installing LGA 775 (socket 775) heatsinks
Intel’s new heatsink design for the LGA 775 socket is actually less
cumbersome and easier to install than the previous designs. In place of
the somewhat complex locking mechanism is a simple set of four holes which
correspond to four pillar-like fasteners mounted around the body of the
heatsink.
Simply lower the heatsink down onto the processor and line each of the
fasteners up with the corresponding hole in the motherboard. A hard press
on the top of each fastener, four satisfying clicks, and the heatsink is
mounted. Attach the 4-pin power cable to the CPU fan header and you are
ready to go.
Installing a ‘socket A’ AMD heatsink, or a socket 362/ ocket 7
processor heatsink
The above listed socket types all use essentially the same heatsink fastening
mechanism, differing only in the relative fragility of the processors
involved. A word to the wise… AMD Athlon, Duron and Athlon XP chips are
quite fragile and easily damaged by clumsy heatsink installation. Do
yourself a favour and be careful. Any computer shop is going to spot a
processor that has been mangled by a careless install and will refuse you
warranty service.
These instructions cover the AMD Athlon, Duron and Athlon XP+ Socket A
processors, as well as socket-based Intel Pentium 3 processors and older Socket
7 chips by many manufacturers.
The socket has 2 main retention clips, one on each end. Note the raised
area at the ‘top’ of the socket, with the socket number written on it.
This corresponds to a hollowed-out area on the surface of the heatsink, allowing
you to correctly align the heatsink on the socket. If your heatsink does
not have this area, the long side of the clip attached to the heatsink should
face the raised area. Remember that the heatsink should sit flat and
parallel with the surface of the processor when installed correctly.
With the heatsink sitting flat on the processor, hook the short side of the
clip to the retention clip on the ‘bottom’ of the socket (the side without the
raised area). It should go on easily, as there is no tension on the clip
yet. Make sure not to apply any pressure to the heatsink during this
operation. Once the clip is attached at one end, push the other end of the
clip down gently and examine the way the heatsink sits on the processor.
It should be almost exactly parallel and not overlapping the socket. If
all looks well, gently but firmly press down on the other end of the clip, so
that it attaches to the other retention mechanism. Depending on the
heatsink, you may have to use a flathead screwdriver to apply the necessary
force to attach the clip. Just be careful not to slip… Once the
other retention mechanism is attached, you’re ready to go. Just remember
to attach the power cable for the fan!
Installing an Athlon 64/FX heatsink
AMD’s new 64-bit chips have had quite a varied array of sockets so far in
their young life. Sockets 754, 939, 940 and AM2 to be
specific. Thankfully, the actual installation methods have not changed
that much between each of the three designs. Athlon 64 heatsinks clip
directly to the plastic retention bracket surrounding the socket. They
have a lever on one side of the cooler which also attaches to the bracket and
provides extra pressure so the heatsink sits firmly on the processor. The
heatsinks are symmetrical so they can fit either way into the retention
bracket. Fasten both sides of the heatsink to the clips on the bracket,
ensuring that the heatsink stays straight and that you do not put excess
pressure on it. Once the ends of the heatsink are fastened, push the lever
down firmly so that it grabs onto the clip provided for it.