Step 6: Installing the floppy drive
I have
occasionally tried to get
away without a floppy disk drive (FDD) on some of my computers, and without exception,
I have regretted not having one at some crucial moment.
Ensure
that one of the 3.5-inch bays in your case is
open. If your case came with rails for the floppy drive, attach them to the sides of
the drive and slide the drive into the front of the computer until it clicks into
place. Rails are small metal pieces which clip or screw on to the sides of the
drive and allow it to be inserted and removed from the case with minimal effort in
case you are wondering.
 Otherwise, slide the drive into the front of the
computer until the faceplate of the floppy drive is flush with the front bezel of the
case and the screw holes along the side of the drive line up with the
case. When everything lines up, screw the floppy drive in securely on
both sides.
Otherwise, slide the drive into the front of the
computer until the faceplate of the floppy drive is flush with the front bezel of the
case and the screw holes along the side of the drive line up with the
case. When everything lines up, screw the floppy drive in securely on
both sides.
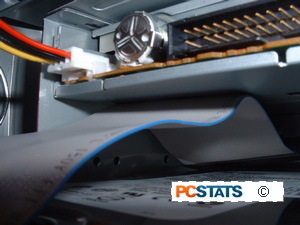
Plug in the power cable
(see pic to right) carefully, since it is quite possible to miss
one of the connectors, which will quite possibly cause some damage when the
computer is powered on. Floppy drive power connectors are keyed in most
cases, but if not, the red wire should be connected to the pin designated as 1
on the surrounding PCB.
Ensure
that the power connector is
correctly lined up with all 4 connectors. A flashlight is a good thing to have
at this point. The floppy (data) cable is keyed to only fit one way. Note that
it is keyed the opposite way to the IDE hard drive and CD drive, so that the red
stripe on the cable should be facing the floppy drive power
cable.
Floppy drive cables are solid ribbon on one end, and the
other has a small section of the ribbon cut and twisted around. Ensure you only attach the floppy cable as shown in
the picture below (cut portion of the ribbon attaches to the
FDD itself).

Connect the data cable between the drive and the
'floppy1' connector on the motherboard.