|
This article is intended to
deal with creating Virtual Private Networks (VPNs) to connect a home network with the outside world.
100% Rating: 
|
|
|
|
Home >
Reviews >
Beginners Guides >
PCSTATS |
|
|
Creating a VPN in Windows XP
Now that
we have covered some of the theory behind Virtual Private Networks, let's go
about setting one up. The following set of instructions will allow you to
set up a Windows XP computer in your home network to accept VPN connections from the
internet, allowing you or other users to access your network remotely as if
you were on a locally connected computer. Once that is configured we will then go
through the procedure to create and dial a VPN from a remote
computer.
First
some notes about Windows XP and VPN connections... Windows XP is designed for
only a single user to connect via VPN per interface, up to a maximum of three
concurrent connections. In other words, if you have a single connection to the
Internet, you can support a single VPN connection through it at any time.
As mentioned earlier in this
article, PPTP VPNs, though less secure than their L2TP/IPSec equivalents, are
recommended for home users, due to the comparative ease of setup. The difficulty
with L2TP is that it is oriented towards use in larger network environments and
Windows domains, and by default requires a security certificate to operate.
In theory, a L2TP VPN can be used by setting a preshared
key on each system, but hosting a VPN like this within Windows XP is difficult.
It can be done, certainly, and there are even methods of generating your own
security certificates without the use of a Windows server OS out there (https://www.shininglightpro.com/index.php?treeloc=36
), but it's labour intensive,
and beyond the scope of this article.
We will cover setting up both types of
VPNfor client connections, but only PPTP for creating a VPN server. To set up your computer to accept VPN
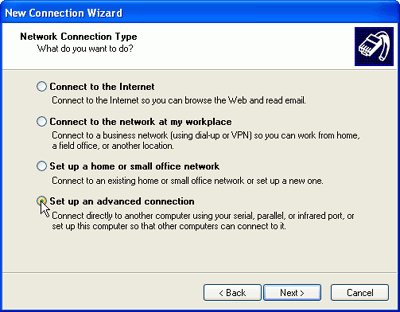
connections go to start/programs/accessories/communication and start the new connection wizard.
Select 'set up an advanced
connection.'

Select 'Accept incoming
connections.'

Skip the 'devices for incoming
connections' screen, as it is only relevant for local computers, not remote
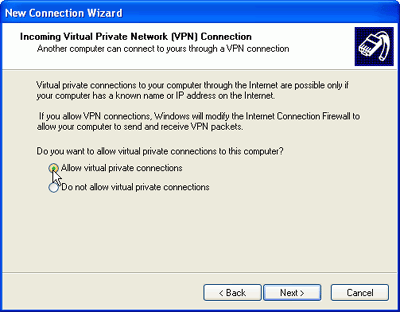
ones. Hit 'next.' Select 'allow virtual private connections.'

The next screen allows you to
select which current user accounts have access to the computer remotely through
a VPN. Please ensure that the account(s) you select have secure passwords set on
them. You can also create a new user on this screen by using the 'add'
button.

Highlight 'internet protocol
(TCP/IP)' and select 'properties.'
|
< Previous Page
|
© 2025 PCSTATS.com
Please respect the time and effort that went into creating each PCSTATS Beginners Guide, do not illegally copy. Thank you.
|
Next Page >
|
|

