Beginners Guides: Upgrading A Motherboard Without Reinstalling
Swapping out a that old motherboard for new one, and potentially radically different hardware is often a quick road to the Blue Screen of Death. Of course, we have a guide to getting this done, without reinstalling your entire PC. - Version 1.0.0
A computer's motherboard, the backplane of circuits, ports
and slots that allows the processor to communicate with all the
other hardware, is arguably the most important component in an entire PC. Besides
linking hardware together, it also acts as the focal point for the operating system,
allowing it access to all the hardware components.
Sadly, with the constant pace of change in the processor and chipset markets,
motherboards become outdated very quickly when it comes to upgrade options. This
means that any major new computer upgrade tends to require a new motherboard
with it, and this brings a whole new set of complications.
You can upgrade a processor or add a new memory module without
causing so much as a blip from Windows XP, but a new motherboard
can and will cause XP to stop booting altogether. Many have tried, and many have
been greeted with the cold gasp of the
Blue Screen of Death for their efforts. Fortunately, the procedure for correctly
installing a new motherboard is rather easy and straightforward, and more fortunately, we're here
to talk you through it.
PCstats never-ending quest to save you from computer store labor charges
continues... after all, this is the exact same procedure a Service Center will
charge you $80/hr to do.
The easy part: Physically removing and replacing
the old motherboard
As stated above, the motherboard is the large circuit
board upon which the processor, memory and expansion cards are mounted. Despite their
complexity, motherboards are rather easy to remove from the
inside of a case since they are held in place by just a half-dozen
Phillips-head screws.
Step 1: Removing the old
motherboard
First let's look at how to remove your old motherboard and install the new
one. This is a strictly physical operation, no software skills
required. You'll need a Phillips-head screwdriver (preferably magnetized),
a small flat-head screwdriver and some free desk space.
Power off your system and remove the side panel so that you can look into the
body of the case and see your motherboard. Unplug all wires from the back of the
computer except for the power cord. By leaving it in, with the power supply
turned off, it acts as a ground.
Place the case on its side on the desk. You may wish to
touch the side of the power supply before continuing, to ground any static
charge you may have. Static electricity can seriously hurt computer
components, and it
does not take a lot.
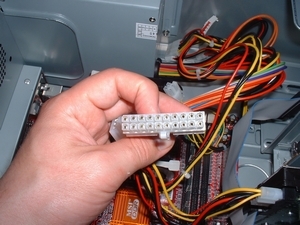
Unplug all the internal wires connecting the case and drives to the
motherboard. Start with the 20-pin ATX power cable pictured below.

Once all wires and other obstructions have been unplugged and moved out of
the way, Remove any PCI and AGP expansion cards which are installed. This is
done by unscrewing the brackets, and then carefully pulling the card vertically
out of the socket.

