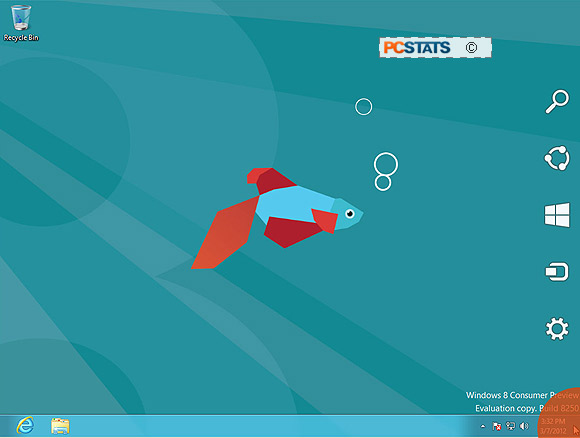
The navigation is a little different here,
to bring up a menu bar which is hidden along the right side of the page you
need to move the mouse pointer to where the orange circle is in the lower right corner and
wait a moment or two.
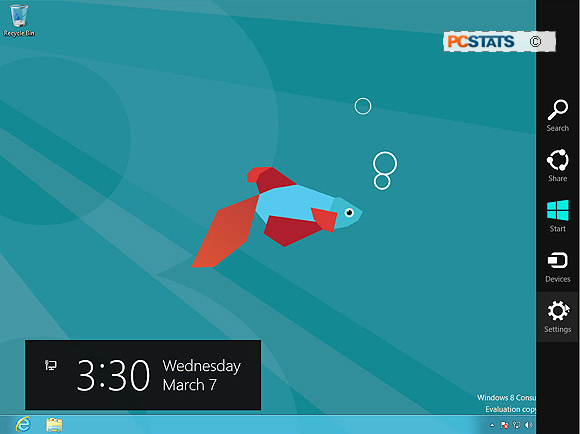
This black menu bar will then slide out from the right hand side
of the Windows 8 desktop.
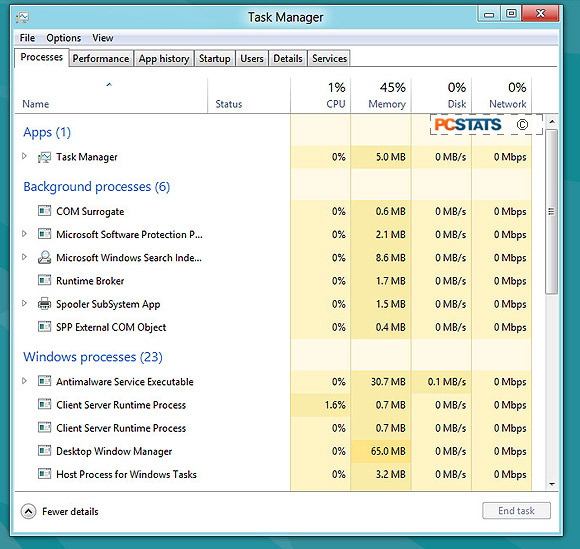
"Ctrl-Alt-Delete" will bring up a much
advanced version of Task Manager.
Removing a Virtual Machine
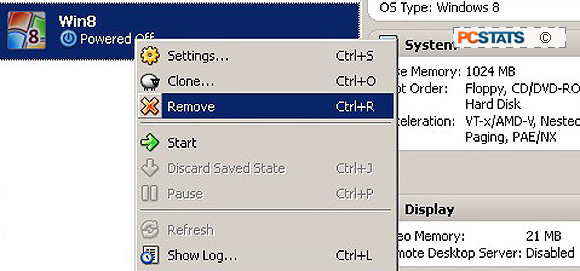
When you wish to remove the 'Win8' virtual machine,
simply right click on the 'Win8' name and select 'Remove' > 'Delete all
files.' That will delete it and every program installed to the virtual Windows 8
PC system.
Tip 1: Transfer files via Network Share between the Host &
Virtual System in Oracle VM VirtualBox.
Moving files between a Host system and Virtual system is not as straight forward as Copy and Paste or Dragging and Dropping from one window to the next - remember, you've created a virtualized Windows installation that for all intents and purposes is a distinct computer within a computer. Transferring files is not impossible, nor is it even difficult... we simply must configure a shared directory in a special way.
To do
this; start the virtual Windows 8 machine and from the top of the window select Devices > Install Guest Additions > follow this through till the system prompts to restart.
Next, create a
new folder on the host system desktop and label it "VIRTUAL_SHARE". Then, in the virtual machine window, select Devices > Shared Folders... > click on the little blue folder icon with the green plus to 'Add Shared Folders' > for Folder Path, click on the little black arrow and navigate to the folder "VIRTUAL_SHARE" on the host system desktop. You could also share an entire partition like the C:/ or D:/ drive if you wish. Be sure to check "auto-mount" and check "make permanent" so that the share is visible when you run the virtual system the next time.
Next, while still
in the virtual machine window, create a Network Drive by right clicking on the Start button > Windows Explorer > right click on 'Computer' and select 'Map Network Drive...' > by the 'Folder:' heading click the 'Browse' button and expand the [+] sign by VBOXSVR and select the '\\VBOXSVR\VIRTUAL_SHARE'. Click Ok, then Finish. That's it!
Now when you expand 'Computer' in Windows Explorer you will see the virtual machine C:\ drive and the mapped network drive 'VIRTUAL_SHARE (\\VBOXSVR) (Z:\)'.
To move files between the host system and virtual
machine, simply copy files to and from the shared folder - VIRTUAL_SHARE - which
you've just created on your host machines' desktop.
Tip 2: Enabling USB 2.0 Drives in the Virtual
Machine
If you want to move files about via a USB thumb drive, there are a couple
extra steps to enable USB 2.0 devices in the virtual machine environment - by
default the VM doesn't 'see' any USB drives connected to the host computer.
Since these steps aren't self-evident, I thought I'd jot down this quick tip and
save someone a bit of frustration in the future.
To enable USB 2.0 devices (ie. not USB mice or keyboards, but USB thumb
drives and so forth) we need to install the "Oracle VirtualBox Extension
Pack" as well. Download and install the Extension pack from here (https://www.virtualbox.org/wiki/downloads).
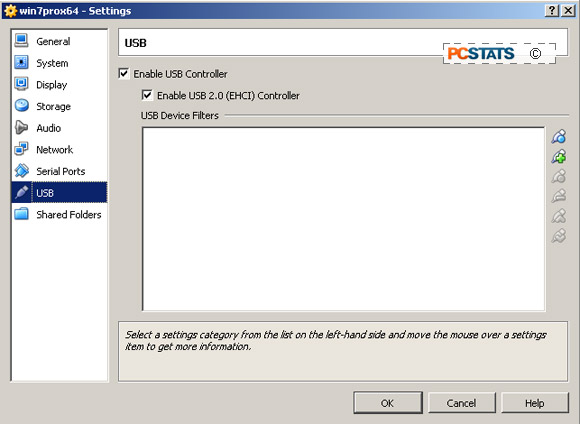
launch oracle vm virtualbox > right click on the virtual machine >
settings > usb > check 'Enable USB Controller' and check 'Enable USB2.0
EHCI Controller' > Ok > Start virtual Machine.
Now when a USB thumb drive is connected to the PC, you can make it accessible
in the Virtual Machine window by going to Devices > USB Devices > [click
on device name].
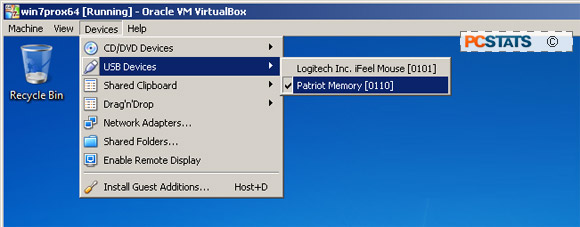
The USB thumb drive will mount to the virtual machine and be accessible via
Windows Explorer as normal.
Naturally, when the USB device is being used by the Virtual machine, it is
not accessible to the host PC system and vice versa. To disconnect the USB drive
in the Virtual Machine, go to Devices > USB Devices > [unclick on device
name] and it will be released back to the host PC.
Tip 3: How To Bring Back the Start Menu in
Windows 8
Once Microsoft Windows 8 Consumer
Preview boots to the virtual machine desktop you'll be presented with the totally new 'Metro'
user interface. It will take a bit of learning to get used to this maze of
icons.... navigation is very different and we here at PCSTATS found it quite frustrating, at
first.
If you get lost in escape-less App screens, remember
you can always tap 'Ctrl-alt-Del' to bring up Task Manager and a way out. To do this
in a virtual machine you cannot use your keyboard, instead, from the VirtualBox Window go to Machine
> Insert "CTRL-alt-Del".
To get rid of Windows 8 Metro user interface and bring
back the familiar Start Menu, here's what you have to do:
Within the 'Win8' virtual machine, open an Internet
Explorer browser window and go to https://www.lee-soft.com/vistart/. download the vistart
application to
the virtual pc desktop.
from within the 'Win8' virtual machine, install ViStart and be
careful to decline all the additional programs it offers
during the installation steps.
After the app installs the Start menu will
reappear in Windows 8 Consumer Preview.
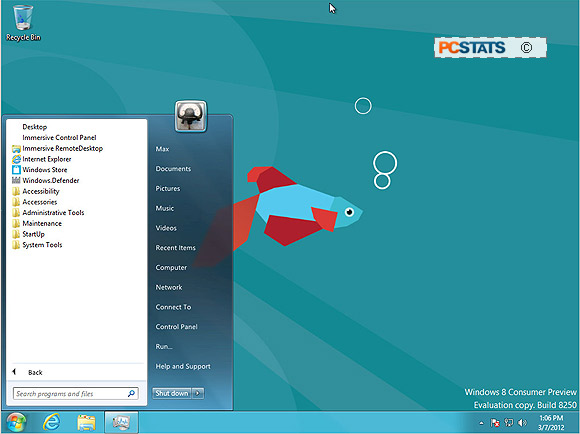
As far as PCSTATS is aware, registration hacks that worked with
Windows 8 Developer no longer hold water, so
ViStart is the only working solution.
Tip 4: Benchmark Results for Windows
8
If you're curious about Windows 8
performance, PCSTATS has benchmarked Windows 8 with
an AMD Bulldozer CPU. There's a full set of CPU benchmarks comparing
the same platform installed with Windows 7 and Windows 8;
you might be interested to see how "fast" Windows 8 really is....
If you have any comments or questions, please let us
know using the PCSTATS Feedback page. Find out about this
and many other reviews by joining the Weekly PCSTATS.com Newsletter today! Catch all of PCSTATS
latest hardware reviews
right here.

