PCSTATS     
[X]   Directory of
Guides & Reviews

Beginners Guides
Motherboards by Brand
Weekly Newsletter
Archived Newsletters

+70 MORE Beginner GUIDES....
Beginners Guide: How To Install / Remove an Intel Socket LGA2011 CPU
Beginners Guide: How To Install / Remove an Intel Socket LGA2011 CPU - PCSTATS
Installing a socket LGA2011 Intel Core i5 or i7 processor into a fresh motherboard can be intimidating step, particularly if you've never worked inside a PC before. Well, PCSTATS has heard your calls for a quick Beginners Guide on this subject, so that's what we'll be laying out in this article today!
Filed under: Beginners Guides Published:  Author: 
External Mfg. Website: PCSTATS Aug 14 2014   Max Page  
Home > Reviews > Beginners Guides > PCSTATS Beginners Guide

Inserting the socket 1366 CPU the right way

Step 2: Remove the socket LGA2011 Intel Core i5 or i7 processor from its box and plastic clam shell packaging. Take off the protective black plastic chip carrier while being careful not to touch the gold pads on the underside of the processor.

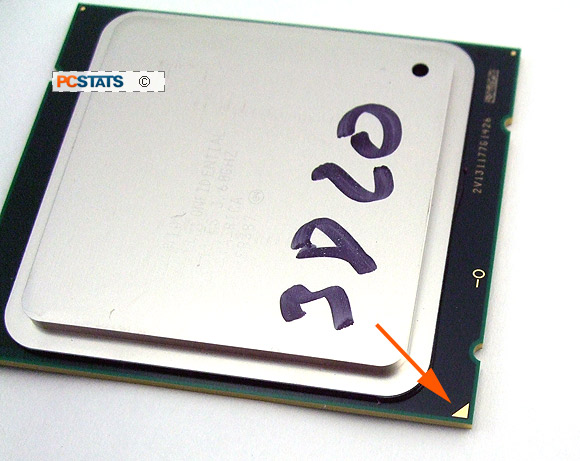
Note which corner of the processor has the little gold triangle (highlighted in the image above) and align this mark with the triangle stamped into the LGA2011 metal socket frame (highlighted below).

While holding the CPU by the edges without the notches 
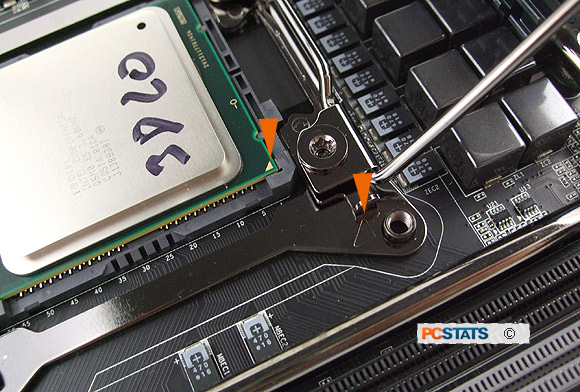
, gently lower the Intel processor, vertically, down into the LGA2011 socket.

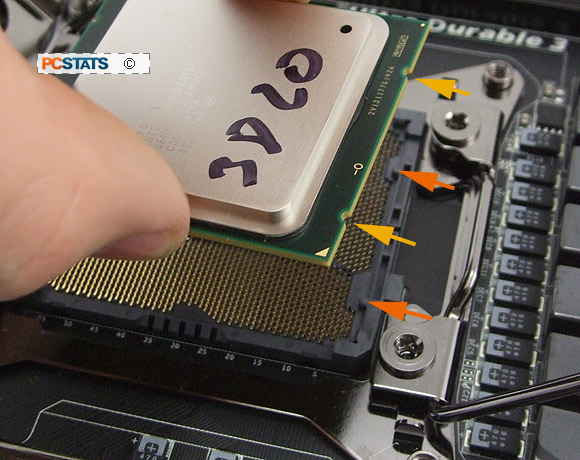
Ensure the notches in the CPU substrate (yellow arrows, above) line up with the corresponding tabs in the LGA2011 processor socket (orange arrows, above).

If you hold the CPU at the center, you'll find there is enough clearance for your fingertips to lower the CPU all the way into the socket.

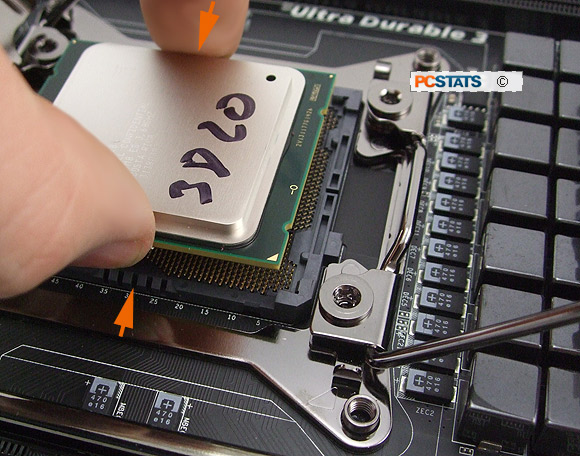
Other ways of holding the CPU may force you to drop the processor into the socket and this can cause damage if it goes in slightly crooked and bends a contact pin.

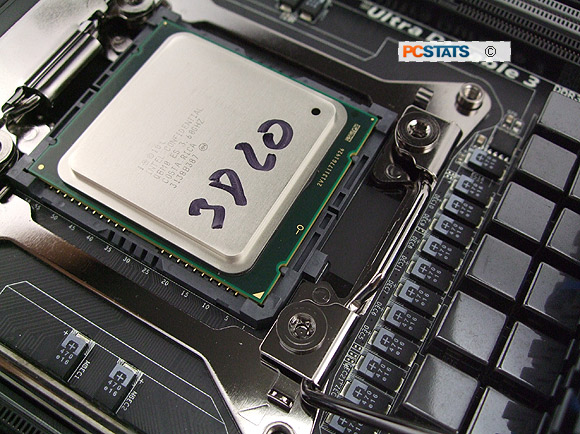
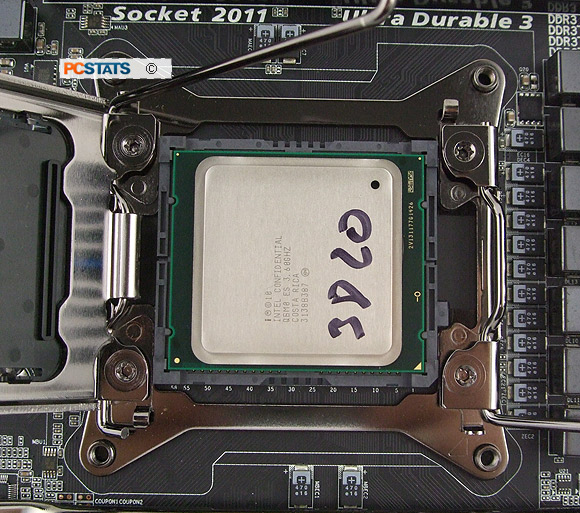
When properly installed, the gold triangle will line up with the triangle in the metal LGA2011 socket frame, the processor will be sitting flush in the socket and both sets of tabs will be matched to the notches in the green CPU substrate, as pictured above and below.

If the CPU is not flush in the socket, or the tabs are not aligned, remove the CPU and double check the orientation before reinstalling the CPU into the socket again.

Next up, locking the CPU in place.

< Previous Page © 2023 PCSTATS.com
Please respect the time and effort that went into creating each PCSTATS Beginners Guide, do not illegally copy. Thank you.
Next Page >


Contents of Article: PCSTATS Beginners Guide
 Pg 1.  Beginners Guide: How To Install / Remove an Intel Socket LGA2011 CPU
 Pg 2.  Installing an Intel LGA2011 Processor
 Pg 3.  Installing an Intel LGA2011 Processor, continued
 Pg 4.  — Inserting the socket 1366 CPU the right way
 Pg 5.  Locking the Processor in Position

 
Hardware Sections 


PCSTATS Network Features Information About Us Contact
FrostyTech
PCSTATS Newsletter
Tech Glossary
Technology WebSite Listings
News Archives
(Review RSS Feed)
Site Map
PCstats Wallpaper
About Us
Privacy Policy
Advertise on PCSTATS

How's Our Driving?
© Copyright 1999-2023 www.pcstats.com All rights reserved. Privacy policy and Terms of Use.