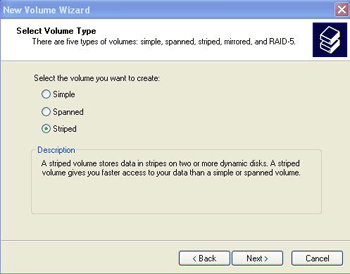
In the 'select volume type' Window, select 'striped.'

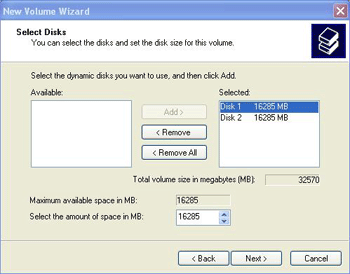
Add all disks you wish to use, then decide on the amount of space on both
disks you wish to use for the striped volume you are about to create. If
you wish, you use only part of each disk for the stripe, leaving the rest free
for other uses.

Choose a drive letter or folder to use, and the method of formatting, and you
are done. The striped array will format and be ready for use.
How to set up hardware RAID:
For this section, we
used a Highpoint HPT 372 ATA/133 RAID controller built into an Epox
EP-8K5A2+ motherboard. The drives we used to test our RAID configuration were a pair of Seagate
Barracuda ATA 5 7200RPM 120GB hard disks. We also set up
a second hardware RAID configuration on a Promise 20276 ATA/133 RAID controller built
into an MSI KT3 Ultra2 motherboard, attached to the same pair
of 17GB drives used in the software RAID setup above.
These two controllers are typical of hardware RAID solutions found on modern motherboards
and add-in PCI cards.
We wanted to include instructions for both Highpoint and
Promise controllers, as these two companies dominate the home desktop and
enthusiast market for RAID controllers. Most RAID setup functions are
standard, so if you do not have the same exact controller, these instructions
should still translate well.
The following instructions assume two identical blank hard disks. It
also assumes that you have correctly installed the Windows drivers for your RAID
controller. We used the most recent BIOS versions for both controllers,
and we recommend that you obtain these from the manufacturer's website if you
have not done so already.

