Step 1: Create directories
As we start through the procedure for
creating your slipstreamed CD, the first thing you must do is create a pair of separate directories to hold the WinXP installation CD and Service Pack 2
data in.
On a hard drive with at least 1.5GB
of space free, create two folders using Windows Explorer. One will be called
'XPCD' and the other 'SP2.' It's best if you create these folders right off the root directory of your drive, ie D:/XPCD and D:/SP2, to avoid
confusion later.

Step 2: Move the Service Pack 2 file
Time to move the Service Pack 2 file to a location where it can be easily extracted and used. WinXP-SP2, 266MB, is
available here. Move the Service Pack 2 file
(WindowsXP-KB835935-SP2-ENU or similar) to the root directory of the drive you just created the 'XPCD' and
'SP2' directories in.

Step 3: extract the service pack
files
The Service Pack is downloaded as a single compressed file. We need to
extract it into the directory we created in order to go about using it to update
our XP files.
Open a command prompt by going to 'Start / Run' and typing 'CMD.' Navigate
to the root directory of the drive you are using for this procedure by typing the
drive letter followed by a colon. For example, to get to the D:/ drive,
type 'D:'

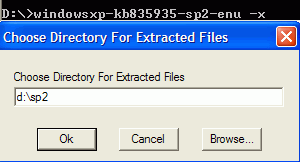
Type the name of the service pack followed by '-x' and press enter.

A window will pop up prompting you for a location to uncompress the service
pack files to. Enter the location of the 'D:/SP2' directory you just created
and hit OK. The service pack files will be extracted to that
location.

