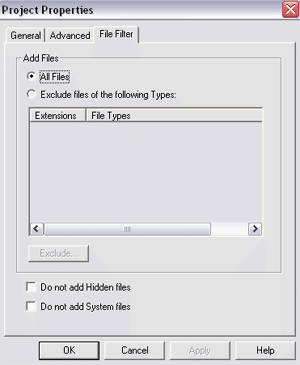
Now go to 'file\project properties.' On this screen, 'file
system' should be set to 'Joliet' and 'physical format of disk' to 'mode 1:
CD-ROM.' Now go to the 'file filter' tab and uncheck both 'do not add hidden' and 'do not add system
files.' Ensure that the setting at the top is on 'all files.' Click 'OK.'

In the 'select source' pane, navigate to your 'D:/XPCD' directory and highlight
all files and folders. Click the 'add to project' arrow to move these
files onto the CD. Remove the 'Microsoft corporation.IMG' file from the
bottom pane, then hit the 'burn to disk' button to create your CD.
In the 'record setup' screen, choose the 'record' and 'disk-at-once' options,
then create the CD. You should now have a usable Windows XP install CD
with Service Pack 2!
That is it for this section of the guide, if you have
followed all of our steps correctly, you will have created a WindowsXP install
CD with WinXP Service Pack 2 integrated right into it. With this one CD you can
install a PC as you normally would with the Microsoft WindowsXP installation CD, except that when you load
up Windows and right click on My Computer, you will clearly see that WinXP
SP2 is already applied.
For IT departments looking to save time, and ensure that
the most updated versions of Windows is consistently being installed,
Slipstreaming is a powerful tool. However, Slipstreaming also works with
Windows2000, an operating system still in wide use
in corporate environments. Let's look at how to Slipstream Windows2000 Installation CD with Windows2000
Service Pack 4 now.
Slipstreaming Windows
2000 bootable CDs with Service Pack 4
Windows 2000 and Windows 2003 server can be Slipstreamed using the exact same
method as we detailed above. The only difference is the amount of disk
space required for the files and the file names themselves.
Download Windows 2000 Service pack 4 (132MB) and
follow the same step as we have as described above for
WinXP.

