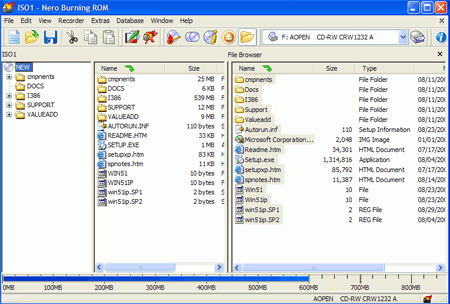
Now click the 'new' button to open the CD content window. In the file
browser to the right, navigate to your 'D:/XPCD' directory and expand it. Now
select all of the files and folders in the far right pane and drag them into
either of the blank panes to the left. Now highlight the 'Microsoft
corporation.IMG' file in the left window and delete it, since it is not needed
on the CD.

Now click the 'burn' button on the toolbar and check the 'write' and
'finalize CD' options before burning the CD. Now you can use your newly
created disk to install Windows XP with Service pack 2 already installed!
Step 7B: Create the bootable WinXP Service Pack
2 CD with Roxio Easy CD and DVD creator 6
Now that we have all the files and folders prepared,
let's look at how to create a bootable CD out of them with Roxio's Easy CD and DVD creator software, since this is the second most popular burning software
on the market, and just as capable as Nero 6 at getting the job
done.
Start Easy CD and DVD creator and select ‘file\new project\bootable disk.’
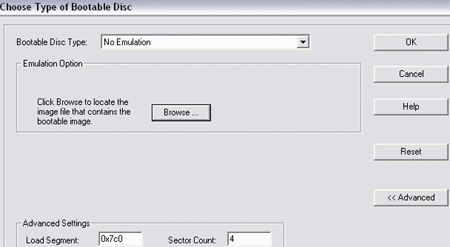
In the ‘choose type of bootable disk’ screen, set the ‘bootable disk type’ drop down box to ‘no emulation.’ Click the ‘advanced’ button and set ‘load segment’ to ‘0x7c0’ and ‘sector count’ to 4.

Click the 'browse' button and navigate to the 'Microsoft corporation.IMG'
file you extracted from the XP CD in the previous step. Click 'Ok.'

