Once you have integrated the WinXP files with the Service
Pack 2, you can also use the resulting directory to install the Slipstreamed
Windows XP version over a network. Be aware that you will need a volume license from Microsoft in order to
do this legitimately. This applies mostly to corporate or office situations, so
the next few steps are a definitely a must for IT professionals to read
through.
There's a couple of ways to go about creating a
streamlined network installation file, but since one of the ways involves
a Windows 2000 or 2003 Server using RIS (Remote Install Service) we'll go with
the other, simpler one.
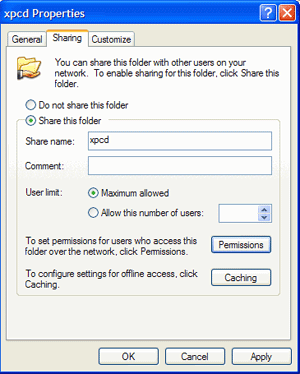
First you must share your 'D:/XPCD' directory. To do this, right click on
the folder and choose 'sharing and security...'
From the 'XPCD properties'
window, choose 'share this folder.'

Your XPCD directory will now be shared over the network under the name
'XPCD.' To test this out, open the run command ('start\run.') and type
'\\(yourcomputername)\XPCD'
The XPCD folder should open in a new window. You are now ready to allow
other users to access the install files.
You need to create or acquire a network boot disk which will work with your
existing network card and allow you to access the network share without Windows
being installed.
We've assembled three locations where you can download pre-made network boot disk
images:
https://www.nu2.nu/bootdisk/network/
https://tdonline.com/bootdisk.htm
https://www.users.on.net/~driver/bootdisk/
with the use of these boot disks and the 'winnt.exe' file found in the 'I386'
directory, you should be able to install WinXP over the network. This is not
a procedure for beginners though, and will require various changes depending on
your system's configuration. Remember to partition and format the drives
on the system that will have XP installed, so that they are visible during the
install process. Good luck!
Find out about this and many other reviews by
joining the Weekly PCstats.com
Newsletter today!

