PCSTATS     
[X]   Directory of
Guides & Reviews

Beginners Guides
Motherboards by Brand
Weekly Newsletter
Archived Newsletters

+70 MORE Beginner GUIDES....
Beginners Guides: Unattended Windows 2000/XP Installations
Beginners Guides: Unattended Windows 2000/XP Installations - PCSTATS
Make a customized Windows XP Install CD with all the drivers included, that installs by itself.
 100% Rating:   
Filed under: Beginners Guides Published:  Author: 
External Mfg. Website: PCSTATS Dec 21 2004   M. Dowler  
Home > Reviews > Beginners Guides > PCSTATS Beginners Guides

Step 6: Extracting the boot image and creating a custom boot CD

We need a bootable CD image file in order to create a bootable CD from our newly modified Windows XP files. Fortunately, the Windows XP CD (or the Windows 2000 CD, 2003, etc.) already has a perfectly usable boot file; we just need to get at it. For the purposes of this article, we'll use the freeware program 'Isobuster' available here.

First, download and install IsoBuster. Now Insert your original WinXP CD into the drive and open up Isobuster. Navigate to the 'bootable CD' directory. In the right hand pane, highlight 'microsoft corporation.img'. Right click it and select 'extract Microsoft corporation.img'. Extract the file to your 'bootcd' directory.

Now its time to assemble all our files together and create a bootable XP CD with the aid of the boot image we just extracted. We'll use Nero 6 to do this.

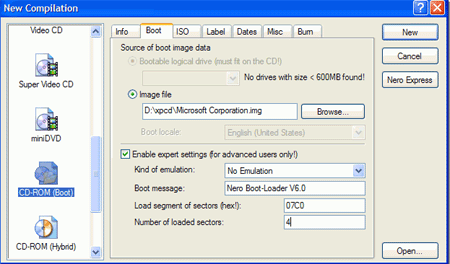
Start up Nero and select 'CD-Rom (boot)' as the type of disk you wish to make.

From the 'boot' tab, change the image file to the 'Microsoft corporation.img' file that you extracted from the XP CD in the last step. Note that you will have to change the 'files of type' box from .IMA files to 'all files' in order to locate your file in its directory.

Check 'enable expert settings.' In this section, you will need to change the 'kind of emulation' dropdown box to 'no emulation' and the 'number of loaded sectors' value to 4.
Now change to the 'ISO' tab. Change the 'file name length' dropdown box to 'max. of 31 chars (ISO level 2)' all boxes on the screen should be checked. It's essential that the version of Nero you are using supports the 'do not add the ";1" ISO file version extension' option, or the CD you create will not boot properly. If you have an older version of Nero, you will need to upgrade to at least version 5.5 or newer.

< Previous Page © 2023 PCSTATS.com
Please respect the time and effort that went into creating each PCSTATS Beginners Guide, do not illegally copy. Thank you.
Next Page >


Contents of Article: PCSTATS Beginners Guides
 Pg 1.  Beginners Guides: Unattended Windows 2000/XP Installations
 Pg 2.  Step 1: Copying the source files to your hard drive
 Pg 3.  Step 2 Con't: Installing the service packs
 Pg 4.  Step 3. Windows Setup Manager
 Pg 5.  Step 4: Adding RAID/SATA text-mode drivers
 Pg 6.  Step 4B: Modifying Winnt.sif for driver installation
 Pg 7.  Modifying txtsetup.sif - Part 2
 Pg 8.  Modifying txtsetup.sif - Part 3
 Pg 9.  Step 5: Adding plug-and-play drivers to the CD
 Pg 10.  — Step 6: Extracting the boot image and creating a custom boot CD
 Pg 11.  Burning a bootable CD con't
 Pg 12.  Troubleshooting the customized Windows XP unattended install CD

 
Hardware Sections 


PCSTATS Network Features Information About Us Contact
FrostyTech
PCSTATS Newsletter
Tech Glossary
Technology WebSite Listings
News Archives
(Review RSS Feed)
Site Map
PCstats Wallpaper
About Us
Privacy Policy
Advertise on PCSTATS

How's Our Driving?
© Copyright 1999-2023 www.pcstats.com All rights reserved. Privacy policy and Terms of Use.