|
This article aims to cover the basics of online
security, including a description of the methods online stores use to protect
themselves and their customers.
|
|
|
|
Home >
Reviews >
Beginners Guides >
PCSTATS |
|
|
Exporting a data recovery certificate
Go to 'start\run' and type
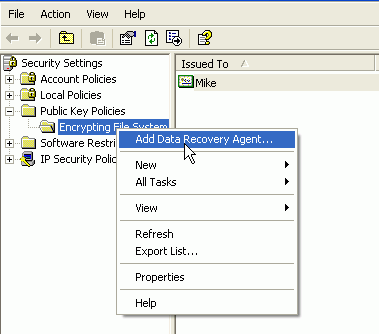
'secpol.msc' to open the local security policies. Navigate to 'Security
Settings\Public Key Policies\Encrypting File System,' and Choose 'Action\Add
Data Recovery Agent.' Click 'Next.'

Click 'browse folders.' open
the filename you created earlier with the 'cipher' command. Click 'next' then
'finish.' The current user is now a data-recovery agent and can decrypt any EFS
encrypted files on the system.
Exporting a data
recovery certificate
In order to be sure you cannot
lose all your encrypted data in the case of an accident, you need to export the
digital certificate you just created for the recovery agent. This will allow you
to create new recovery agents in case something awful happens to your current
Windows installation.
Login to the user account you
made the recovery agent in the last step. Go to 'start\run' and type secpol.msc
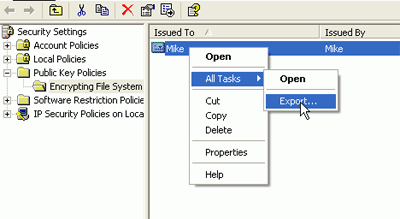
to bring up the local security policy. Navigate to 'Security Settings\Public Key
Policies\Encrypting File System.' Right-click the certificate you just issued
and choose 'all tasks\export.'

Select
the 'DER Encoded Binary X.509 (.CER)' option, and click 'Next'. Now specify the
location you wish to export the certificate to, for example a floppy disk.
Keep it Safe! Now if the
worst happens, you can follow the steps listed above to create a recovery agent,
using the certificate you just exported. Best practice is to now delete the two
files you created with the 'cipher' command in order to ensure that only you
have access to the recovery agent.
Find out about this and many other reviews by joining the Weekly
PCstats.com Newsletter today!
|

