If you are not happy with the
results you are getting from Windows Movie Maker and wish to explore some other
options, you have a few choices.
Note that if you
are unhappy with the results from movie maker because of the performance of
the video, due to choppiness or long pauses, your computer may not be fast enough
to compress video while capturing it, which is what movie maker does. As we
mentioned before, trying to compress video during recording places a heavy
load on your system's processor and memory.
If you have a slower system, but a good amount of
free drive space, try using one of the programs below to capture 'raw' video
(without compression), then compress it after you have finished recording. You
might find this gives you better results.
If you have no problem with
performance so far, but you'd like to explore ways to get higher quality video
captures, you can play around with some of the other programs we detail below.
The first thing you should do though, is download some extra compression codecs.
These are installed on your machine just like drivers, and can be made use of by
various video capture software.
For starters, grab the
codec pack here as it has a good set of high quality video compression
codecs. You can also try Nimo's 'lite' codec pack here.
Install all codecs after
downloading the pack(s), but be aware that the version of the DivX5.1.1 codec
included here contains adware which you may want to avoid or remove. See our
article on adware and spyware for
details.
Now let's take a look at a
couple of easy-to-use freeware video capture programs and one not so easy to
use, but more flexible one.
Using STOIK video
capture
This freeware program is
similar in functionality to the Windows movie maker, with the added advantage of
letting you use downloaded codecs to improve the performance of the video
capture. STOIK can be downloaded here. Once that is done, install and load STOIK video
capture.

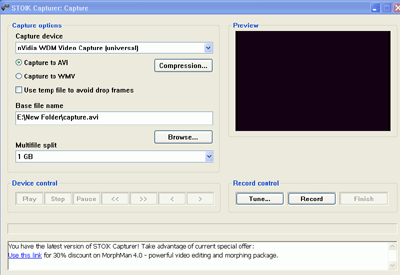
All the action takes place on
this main window. As you can see, the preview window is right there, and should
be active as soon as you press play on your VCR. If not, check your connection,
and then check that you are using the correct capture device. If so, make sure
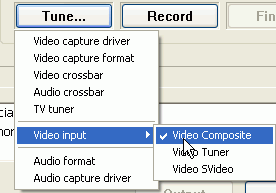
the program is set to check the input method you are using by hitting the
'tune…' button, then selecting 'video input.'

Now change the 'base file
name' to the file, directory and drive where you would like to store the
captured video.

