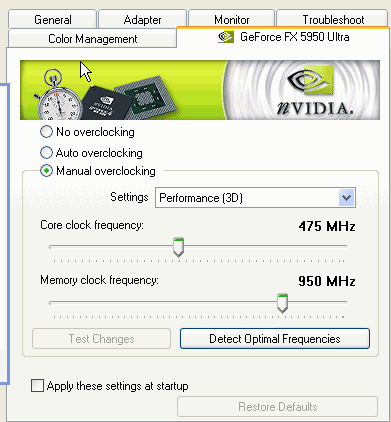
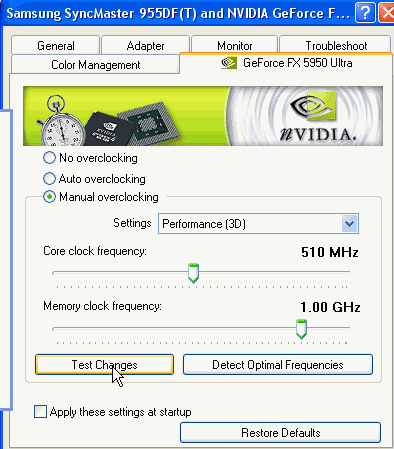
Once Coolbits has been activated, overclocking an nVidia-based card is
simple. Open up the 'display' applet in control panel, then go to
'settings' and 'advanced'. Click on the tab with the nVidia logo and the
name of the videocard to open up the nVidia video card control
application.
From the menu, choose the 'clock frequency' option.

Change the 'settings' drop-down box to 'performance (3D)'. This will
show the default core and memory clock speeds for the video card when it is
running in 3D mode.

Using the sliders, the video card's core and memory speeds can now be
overclocked. Before the new settings can be confirmed, they will need to
be tested using the 'test settings' button. Once the settings have been
affirmed by using this button, the card will be set to the new speeds.
Please note that just because the overclocked settings pass this test does
not necessarily mean that the same settings will work for games or
benchmarks. In PCstats' experience though, this test button seems to err
on the side of caution, so readers may be able to squeeze more out of their
cards than the test button lets them get away with. This is when we need
to turn to a third-party application to overclock further, which is a subject
covered a little later in this article.
The 'auto-detect' button will overclock the card's core and memory speeds
automatically to a 'safe' margin. In our experience, this tends to be
quite close to the maximum speeds obtainable with any given card in Coolbits. It
can be considered a good jumping-off point.
Do not use the auto-detect button if the sliders have already been changed
manually, since this can give some seriously strange results and occasionally
crash the system. Hit the 'default settings' button to return the sliders
to normal first.
The 'apply settings at startup' button will reapply any
custom clock speed settings each time the computer is restarted. With
Coolbits, this works most of the time. It may be worthwhile to
double-check that the new settings have stuck after a reboot.

