1. Turn off or reduce
system restore to save hard drive space
Windows XP includes a system restore utility which is
capable of rolling your computer back to a pre-defined point in time,
removing all changes made to the system since that point. This can be
an extremely useful feature for rescuing your PC from viruses or faulty software problems, but
it also eats up a large amount of hard drive space.
By default, system
restore reserves a whopping 12% of each logical drive for itself. You can considerably reduce the amount of
space system restore uses by cutting back on the number of restore points the utility
sets for itself, or you can turn the feature off altogether.
To adjust system restore settings: Right click on 'my computer'
and select 'properties.' Choose the 'system restore'
tab.
To disable system restore,
simply check the 'turn off system restore on all drives' box. Otherwise, highlight a drive
and click 'settings.'

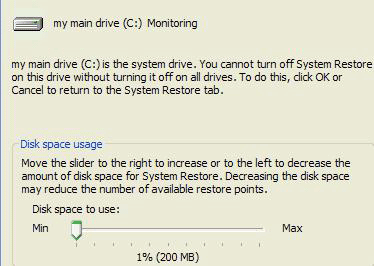
Using the
slider, you can set how much space on this drive system
restore will use for its restore points. Decreasing this number will limit some of
your flexibility in restoring your system should it be necessary, but reducing
the amount down to about 5% or less should still be safe enough for anyone
with a 80GB hard drive. Click ok when you decide
on the exact amount, or choose 5% if you are unsure.
2. Altering page
files
 The
page files are one or more areas of your hard disks that Windows
XP reserves as virtual memory. To put it simply, these reserved areas
are used to contain any data that may spill over from your main
memory.
Virtual memory is accessed by Windows just like physical
memory, but is many times slower, due to the much slower speed of hard drive
data transfer as compared to RAM. Windows XP actually uses the Page files
continuously, regardless of the amount of free memory on your system, so
optimizing these files can have a positive effect on the performance of your
computer.
To optimize the page file(s),
there are a few options you can consider.
Page
File Placement:
Since
Page files require intermittent
disk access to write and retrieve information, putting them on the same
drive as the operating system can compromise the performance of both. Of course,
since most systems contain only a single hard drive, this is not usually something
that can be changed. If your system contains more than one hard disk, consider
placing a page file on the the non-OS disk and removing the one on the OS-disk
containing the Windows files.
To do this: Right click on 'my computer'
and select 'properties' then the 'advanced' tab. In the 'performance' section,
click 'settings' then select the 'advanced' tab. In the 'virtual memory'
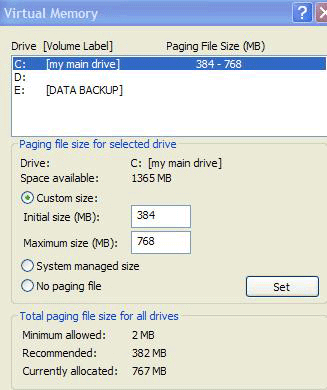
section, click 'change.' From here you can choose
individual drives and customize the size of the paging files you wish to create.
See below for more info.
Page
File Size:
By default, page files are created with a starting size and a maximum
size. These values allow Windows to resize the paging file as system
demand grows. It is more efficient to set an identical starting and maximum value so
that no resources are wasted resizing the file.
To do this, choose 'custom size' for each page file and set the
initial and maximum sizes to the same number.
As for what size to set them
at, the best bet is to leave them at, or slightly below the default 'maximum'
setting the system assigned, with a ceiling of 1GB. This is the amount of space
that is reserved for the file, regardless of its current size. If you are
creating multiple page files, split the amount between them.

