65. Stupid Disk Tricks for
XP Part 2: Mounting Partitions to Directories
Another neat trick you might not have known that you can
do in Windows XP is mount partitions as folders in other partitions. So for
instance you could have a C: drive where you use a peer-to-peer sharing program
such as Kazaa which may require a lot of disk space. You could purchase a new 80
gigabyte drive and mount it as a folder (c:\kazaa files) in C:, then use this to
store your downloads. Very simple and organized.
To mount disk partitions as folders right click on 'my
computer' and select 'properties' then 'manage.' Open 'disk management' from the
computer management window. Right click on the partition you wish to mount as a
directory in the graphical partition window (lower pane) and select 'change
drive letter and paths.'

Remove the current option (if any), then click add.
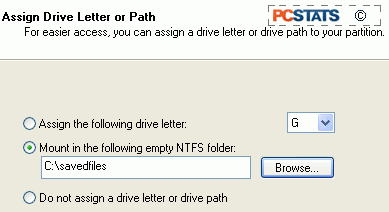
Choose the 'mount in the following empty NTFS folder,' browse to the desired
volume and add a directory for your drive. Click 'ok.'
That's it. If you wish to return things back to the way
they were, simply repeat the procedure, removing the directory location and
choosing a drive letter instead. The data on the drive will be unharmed.
66. Stupid Disk Tricks for
XP Part 3: Creating Software RAID 0
RAID (Redundant Array of Inexpensive Disks) zero is
another name for the technique known as disk 'striping' in which two disks act
as one single hard drive, sharing (or striping) all data between them. This
process considerably speeds up drive performance, especially when reading from
the drives, since the data stream can come from both disks at once. For more
information on other forms of RAID, flip through the pages of PCstats guide on the subject.
Windows XP, like Windows 2000 before it, comes with RAID
0 support built in. If you have two hard drives, you can take advantage of this
feature to speed up your computers disk access (which affects nearly every facet
of the computing experience). Note that you cannot create a RAID 0 stripe with
the partition that holds the Windows operating system.
This means that you will have to have at least two
physical hard drives with free space so you can create a pair of new partitions
to stripe since you cannot stripe an existing partition with data on it
either.
To create a RAID 0 stripe with two identical disks right
click on 'my computer' and select 'properties' then 'manage.' Open 'disk
management' from the computer management window. Convert both drives to dynamic
disks as shown in tip 64 above. Once both disks are listed as dynamic, right
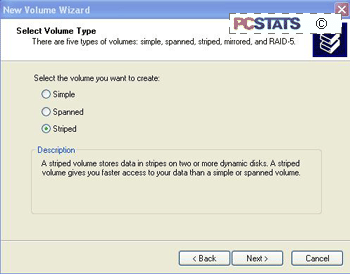
click the 'unpartitioned space' of either drive and select 'new volume.' In the
'select volume type' Window, select 'striped.'

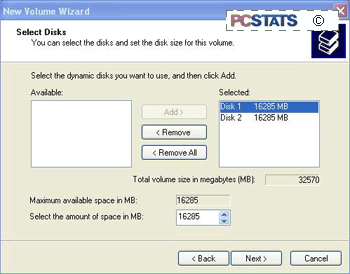
Add all disks you wish to use, then decide on the amount
of space on both disks you wish to use for the striped volume you are about to
create. If you wish, use only part of each disk for the stripe, leaving the rest
free for other uses.

Choose a drive letter or folder to use, and the method
of formatting, and you are done. The striped array will format and be ready for
use.
67. Stupid Disk Tricks for
XP Part 4: Extending and Spanning Volumes
If you have blank space on one of your drives and you
would like to merge this with an existing partition rather than creating a new
partition with a new drive letter, you can do it with dynamic disks.
Extending (enlarging an existing partition to include
free space on the same disk) and spanning (enlarging an existing partition to
include free space on another disk) are both possible with dynamic disks and the
NTFS file system. Note that you cannot span or extend the system volume; the
partition in which Windows is installed.
To span or extend an existing partition open Disk
Management. Right click the partition you would like to expand and select
'extend volume.'
The extend volume wizard will come up. Press 'ok' to get
to the 'select disks' window. Any available space on your dynamic disks will be
displayed in the left hand box. Choose the space you'd like to use and click
'add' then 'next' and 'finish.' XP will format the blank space and add it to the
current partition, no reboot required.

