10. Change the Default Installation
Directory
If you like to install your software on a separate drive
or partition, you might find this tip handy. It will allow you to change
the default installation directory for new programs from 'c:\program files' to
whatever location you'd like.
To do this open Regedit and Navigate to
'HKEY_LOCAL_MACHINE\Software\Windows\CurrentVersion\'
Double click the 'ProgramFilesDir' value. Change
the value to the directory you wish to be the default installation location for
your software.
11. Associate and Un-Associate Applications From
Certain File Types.
File associations are what tells Windows XP which
applications should open which type of files. Every file type has or will
acquire a default program to open it (as long as one is available on the
machine) and will then use this program every time. Since many programs
will change these file associations when they are installed (to make themselves
the default software), it's quite possible to end up with an application you do
not want opening your pictures or documents.
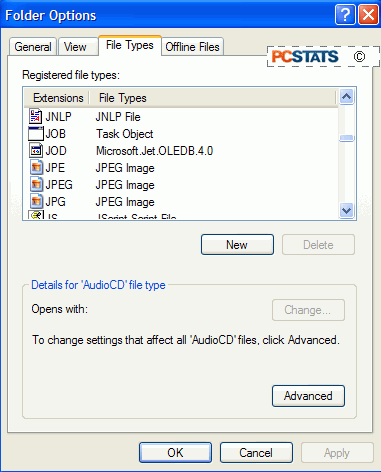
To change this, you will need to open an explorer window
such as 'my computer' then go to 'tools\folder options.' From the folder
options, select the 'file types' tab, and wait while Windows builds
the list of file types present on your PC.

Scroll through the 'registered file types' box until you
find the file extension of the file type you wish to change; JPEG, JPG or JPE
for JPEG graphic files, for example. Highlight it and hit the 'change'
button below to select a new application to open this file type by
default.
As an alternative, you can also right click any file, go
to 'properties.' And click the 'change' button to choose your application.

