27. Assign specific
CPUs to specific applications
Windows Vista allows you to easily assign an application
to run only on a specific CPU, which Microsoft dubs processor affinity. If you
have a dual or multi-core processor in your computer, this can be a good way of
getting some use out of the secondary processors. Your mileage may vary, but
it's an interesting tool to experiment with and a way of seeing your new
multi-core chip at work.
To assign processor affinity
settings to an application:
Start the desired application.
Press CTRL+ALT+DEL and choose the 'task manager'
option.
In the 'applications' tab, locate the desired program
and right click on it. Choose 'go to process'.
 This will
bring you to the 'processes' tab, with the process that drives your application
highlighted. Right click on it and choose 'set affinity...'.
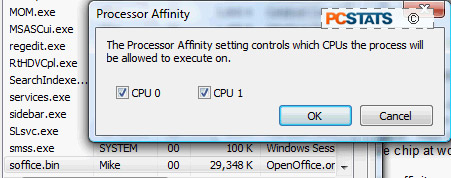
The processor affinity window opens. Using the
checkboxes, select which processor(s) you want to be able to run that
application.
Note that all settings will be reset to default when you
restart the computer.
28. Assign priorities to
applications
All recent Microsoft operating systems have contained
the concept of priority, meaning in this case, which process gets the most
attention from the CPU. In Vista, you can customize these priority settings so
that your hardware is concentrating most on what you want it to.
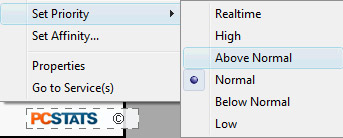
Vista has a range of available settings ranging from
'low' to 'real time'. It should be noted here that any full screen application
(including games) is automatically given high priority by Vista, so there are no
frames per second increases to be had here. What you can do is tweak your
commonly used windowed apps to get the desired level of performance vs. system
resource consumption.
To assign custom priorities to
applications:
 Start the
desired application.
Press CTRL+ALT+DEL and choose the 'task manager'
option.
In the 'applications' tab, locate the desired program
and right click on it. Choose 'go to process'.
This will bring you to the 'processes' tab, with the
process that drives your application highlighted. Right click on it and choose
'set priority'. The priority list will open. Choose your desired level, but note
that choosing 'realtime' is not a good idea if you want to run anything else at
the same time.
Note that all settings will be reset to default when you
restart the computer.
29. Create shortcuts for
running applications with certain CPU/Priority settings
If you've tried out the above two tips for assigning
specific CPUs to processes and assigning priorities, you've no doubt noticed
that all your setting disappear after reboot. How to make these permanent? Well,
there's no real easy way, but there is a workaround you can do by creating a
custom shortcut to the app you want to run with specific CPU or priority
settings. Let's look at how to do this.
 To
create a shortcut to run an application with specific CPU affinity or priority
settings:
First you will need to know the location of the
application you want to run. The best way to find this is with the searchbar in
the start menu. Say you wanted to find the executable file for the Vista
Sidebar. Open the start menu and type 'sidebar' in the search box.
The first entry you get will be the Windows Vista
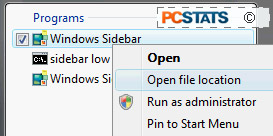
Sidebar executable file. Right click on it and choose 'properties'. Click the
'open file location' button at the bottom of the next Window.
Make a note of the file path in the navigation bar at
the top of the screen. For Sidebar, it's 'c:\program files\windows
sidebar\sidebar.exe'.
Now, drop back to the desktop and create a new shortcut
by right-clicking on the desktop and selecting 'new/shortcut.'
When the shortcut wizard appears, enter the following
into the text box:
C:\WINDOWS\system32\cmd.exe /c
start "(the name of the application you want to start, quotes necessary).exe"
/(LOW, HIGH or REALTIME priority) /AFFINITY (1 or 2) "(the path to the file you
want to run, from the previous step, quotes necessary)"
The brackets should be removed from the above once you
substitute your own items, but all other formatting should remain.
Save the shortcut, then use it to start your app with
the desired custom settings.

