24. Boost external hard drive performance
If you use an external hard drive enclosure as secondary
storage for your vista computer system, or if you regularly use a USB storage
device for large amounts of file transfers, you will benefit from this tip. By
changing the way Vista handles writing data to USB storage devices, we can
considerably boost the access speed and data transfer rate of said device.
By default, Windows Vista does not use write caching on
USB drives, meaning that all data you send to the drive is instantly transferred
to the device. Write caching acts as a buffer between the slow mechanical hard
drive and the fast system memory. In essence, your computer writes to the cache
(another area of memory) which then transfers the data sequentially to the
drive, freeing up the rest of your system to do other things.
By enabling write caching on USB drives, you can
increase the apparent performance of your external hard disk greatly. Note that
flash memory devices will see little to no performance increase with this tweak.
To enable Write Caching on an external drive:
With your external USB drive plugged in and connected,
go to 'start\computer.'
Right click the external drive in the computer window
and choose 'properties.'
Click on the 'hardware' tab.
Highlight your external drive in the list and click the
'properties' button.
Select the 'policies' tab.
Choose the second option marked 'optimize for
performance.' Click ok.
Important:Note that in order to prevent data loss, you will now
have to use the 'safely remove hardware' icon in the taskbar whenever you want
to remove your external drive. This is not necessary when shutting down the
computer system though.
25. Enable Readyboost on
any flash memory device
If you've been paying attention, you'd have noticed that
we have not included Readyboost as one of our performance tips. This is because
PCSTATS tested this Vista feature extensively in a
previous article
and came to the conclusion that the performance gain it
offers is minimal at best, unless you have very little memory available (512MB or
less). Since DDR2 memory is so cheap, it invariably seems a better expense than
buying and using the more expensive ReadyBoost certified flash devices.
However, if you already have a flash memory device or
two around the house and want to play at ReadyBoost, but Vista is telling you
your toys aren't fast enough to join, this tip could be for you.
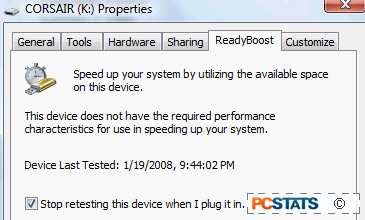
 To enable ReadyBoost on a 'slow' USB drive or flash
memory card:
Insert the device and ignore the autoplay Window.
Open 'start\computer'. Right click on the flash memory
device and choose 'properties.'
Go to the 'readyboost' tab and place a check next to 'do
not retest this device'. Hit 'ok'.
Unplug your USB device.
Open Regedit (open 'start' menu and type 'regedit.')
Navigate to
'HKEY_LOCAL_MACHINE\SOFTWARE\Microsoft\WindowsNT\CurrentVersion\EMDMgmt'
In this folder, there should be a folder corresponding to
each USB storage device you have ever had attached to your computer. Find the
one corresponding to your USB drive and open it.
Double-click on the 'DeviceStatus' value and change it to
'2'.
Now replug your USB device. It will now be recognized as
ReadyBoost capable.
26. Speed up SATA hard drives
in Vista
In a similar mode to Tip # 24, Vista can also be
tweaked to improve the performance of internal SATA (Serial ATA) hard drives.
Vista's write cache has two levels, the more basic of which is enabled by
default. To really enhance the performance of your SATA hard disks you can
enable the 'advanced disk performance' mode.
It should be noted that this tip, like a couple of others
in the guide, has the potential to damage your Vista installation. By extending
write caching (data held in memory to be written eventually to hard drive) you
extend the risk of damaging your system files in the event of a crash or power
outage. That being said, you will experience an increase in drive performance,
so balance the pros with the cons.
To enable advanced performance on a SATA internal
drive:
Go to 'start\computer.'
Right click the SATA drive in the computer window and
choose 'properties.'
Click on the 'hardware' tab.
Highlight your SATA drive in the list and click the
'properties' button.
Select the 'policies' tab.
Select the 'enable enhanced performance' option. Note
the warning. Click OK.

