32. Upgrade to Windows Vista
Service Pack 1 Beta (SP1-beta)
Service Pack 1 for Windows Vista is currently available
as a pre-release version, and promises to provide a whole host of speed tweaks
and fixes for some of the nagging issues that drag down Vista performance,
especially on lower end computer systems.
While installing pre-release software is risky, the speed
benefits that Microsoft outlines are probably worth it. Have a look at this PDF document on Microsoft.com and see what
I mean. Historically, Windows Service Pack updates have provided major benefits
(and occasional major headaches) for users, and this one should not be any
different. Make sure you install it when it is officially released, if not
before.
33. Disable superfetch for
computers with less memory
The Vista Superfetch feature is an interesting one. In
theory, your Vista PC will 'learn' your typical activities in terms of file and
application access, then preconfigure the most commonly used apps in its memory
on startup, making them much faster to access. In practice, this works very well
on computers with 2GB or more of memory, but leads to a lot of disk thrashing
and sluggishness on systems below the magic 2GB line. If you are not happy with
the startup speed of your Vista machine, why not try disabling the Superfetch
feature?
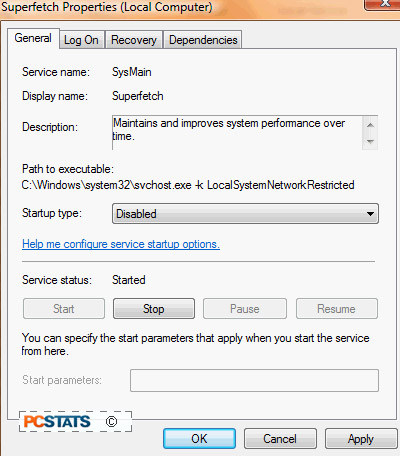
To stop and disable Vista
Superfetch:
Go to the 'start' menu and type 'services' in the search
bar. Hit Enter.
In the services window, scroll down until you reach the
'superfetch' service. Right click and choose 'properties.'

Change the 'startup type' dropdown box to 'disabled' and
click the 'stop' button to stop the service.
Hit 'OK'.
34. Boot Vista with all
available processors
While it takes good advantage of today's multiple core
processors when it's loaded, Vista will still use only a single processor core
when the OS itself is loading. Fortunately you can override this and force Vista
to take advantage of all available processors when starting up.
To force Vista to use all
processors during the startup process:
Right click on the 'start' menu and type 'msconfig.' Hit
Enter.
Go to the 'boot' tab and click 'advanced options.'
Place a check next to the 'number of processors:' option
and change the dropdown box to reflect the number of discrete processor cores in
your computer.
Hit 'ok' to save. You will need to restart to take
advantage of this tip, obviously.

